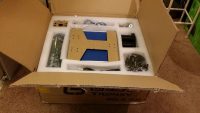
3d Printer -Tronxy 1.75 mm
- City: Seattle
- Listed: 2017-02-04 4:10 pm
- Expires: 6922 days, 14 hours
Description
Thought I’d get a 3d printer.. looked around, finally got this one on Ebay, a RepRap Prusa i3 design. Cost $242 US, from China.
It has a Melzi 2.0 V5 circuit board, Marlin V1.0 firmware, running Repetier-Host.
I had some issues assembling and running this model 3d printer so I’ll list some of the things so I can possibly save someone time. After a lot of online research I’m of the opinion that these aren’t really the best units around. My unit didn’t come with very good instructions, and the supplier was not able to provide me with the original Melzi board software. Having said that, it was cheap, it arrived quickly, was complete, and basically worked, although the display acts funny on occasion. I’ve located the original software online myself, and will reinstall it once I’ve gained some proficiency with the system.
1. Basic assembly went OK, but it had a ridiculously short power cord. I cut the ends of an extension cord, spliced them together, and made it 10 feet long. Also no on/off switch on PS, so I added one as in pic… this is a must have.
2. The X axis end switch was misaligned…. nothing to contact so I bent the metal belt retainer over before I realized that it was for the belt. Too late now, if I would have bent it back it would probably have broken, so I had to put both belt ends onto one retainer as in pic.
3. Also the Y axis endstop switch was not hitting the moving bed so I made the extender out of plumbing strap as in photo.
4. After setup and alignment and wasting time, finally I placed a felt pen marker at the same spot on each of the Y axis motors as in the picture. This way you can easily put them back where they belong if you accidentally move it, and you don’t have to do the alignment all over again. You can see the marks on the picture and in the video.
5 One of my Z axis sliders was very tight and causing the associated motor to slip occasionally… you can spot this when you hear the motor grunting, and the felt pen marks have fallen out of sync. The sliders are just 3D printed parts and not of high precision so its quite unlikely that they will both smoothly slide up and down equally. Anyway, the following worked for me… slightly loosen the screws around the brass/screw collar of the tight slider. (for some reason mine came with only 3 out of 4 screws inserted) Tighten one screw at a time until you can tighten one fully and still have smooth and easy turning of the thread rod. Now slowly tighten the other screws until the binding problem returns…then back-off until it slides smoothly again….repeat for all 3 or 4 screws. You should now feel equal smooth sliding while turning either of the 2 Z axis rods. Next put lock-tight or silicone around the brass/collar and screws to hold it in place. The idea of course is that you should at least have one screw tight for maintaining mechanical strength between brass/collar and plastic slider and the glue will fill in the gaps.
6. I was curious about the current and voltage draw on the power supply during operation, so I made a video of it.
7. I found that when I set the Z offset, it wasn’t “taking” after hitting “losd” and “store memory” unless I shut off power and restarted… now it was permanently set as the new offset.
8. I added the extra fan over the Melzi board, as some of the heatsinks were running quite hot.
9. I was not able to plug in the USB cable into the board as the female USB jack is very close to the X moving axis….see pic… therefore I had to remove 3 bolts/screws from the board and tilt the whole thing back as in picture to print while the USB cable is connected…. crazy.
5909 total views, 2 today


